
So you’re fixin’ to (that’s Texan) launch a new website and want a checklist to make sure your new site is as successful as possible. Whether it’s a brand new website or a redesign, you’ll want to run through this checklist.
We’ll assume your site was fully keyword researched and siloed before launch.
Here Are the Things to do Immediately After Your Website Launches
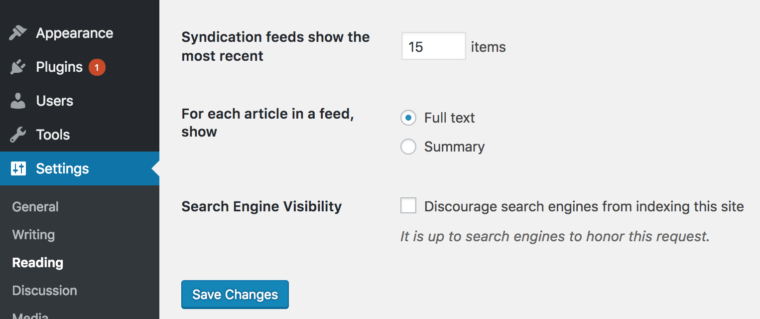
01. Don’t Discourage Search Engines
If the site is built in WordPress, in your dashboard go to Settings/Reading. Make sure the Discourage search engines from indexing this site is NOT checked.
We’ve seen sites sit for months with this clicked, meaning they don’t get indexed, meaning they don’t show up in search, meaning their traffic dries up.
02. Run a Speed Load Test
A fast loading site is crucial to indexing and search engine results.
Test your site at both https://developers.google.com/speed/pagespeed/insights/ and https://tools.pingdom.com/
Perform the optimizations, where possible, to speed up your site. Typically, image compression is the easiest of these to perform. We like Imagify for this purpose.
03. Perform 301 Redirects
Go into Google and search site:yoursiteurlhere.com (ex. site:moonandowl.com). Note there is no space after the colon.
When the search results appear, this is how Google indexes (how it currently presents) your site. There is a 99% chance it is still holding onto the old site in terms of how it is indexed, because it takes a while for Google bots to crawl the new website.
We need to change that so users can get where they are going until the search engines fully index your new site.
Here’s how…
Click each link on the search results page of site:putyoursitenamehere.com. once the new site is live.
See if the result takes you to a 404 page (meaning that is not the corresponding URL on your new site.) Cut and paste any URLs that 404 (aka lead to nowhere on the new site) into a spreadsheet.
Place the URL on the new site that most corresponds to that broken link with a one that works on the new site in column B next to the broken link. Remember, think like an end user and their user intent.
Use a redirect plugin on your site to redirect all the old URLs which are currently 404 to the URL on the new site that most. Use a 301 redirect for these, as these are permanent redirects.
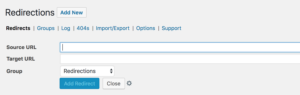
These redirects send the old search result to the appropriate page on the new site. Sooner or later, Google will self-correct, but you want to leave the 301s in place for other sites that have linked to you through that old backlink.
Run a program like Screaming Frog over your site to make sure every page has a unique title and a unique meta description.
Edit those pages that have either a duplicate title or the same meta description as another page on your site. Every page needs a unique title and description.
Remember to write each of your meta descriptions to get a click and convert.

The line in purple is the page title. The two lines in black are the meta description.
Also, make sure each is the proper length. Page titles should be < 70 characters and meta descriptions <200.
Make sure every image has an alt-tag that corresponds to that page. So a picture on a page about poodle food who have the alt-tag poodle food. This gives more clues to the search engines about the subject of the page.
05. Fix Internal Link Errors
Fix any broken internal links on the site.
Use a tool like https://www.deadlinkchecker.com/website-dead-link-checker.asp.
Fix any broken internal links in the site.
06. Manually Check Layout and Proof Every Page
Of course, you want to make sure spelling and punctuation is correct. This should be completed before launch.
Ensure all the content including pages and blog posts made it into the live version.
Also, check the layout on each major browser post-launch.
These manual checks should include the current version of
- Chrome
- Safari
- Internet Explorer
- Firefox
Also make sure you check responsive design on:
- Apple Tablet
- Android Tablet
- Apple iOS iPhone
- Android Phone
Make sure you’ve deleted any demo content, like Hello World posts.
As these are the most valuable clicks on your site, we always recommend manually clicking them.
When you do, make sure they take you to the NEW site version of the page or form, not the development version of the site.
We’ve seen these be taken to a dev version of the site by accident before. Then, when the developer pulls down the dev site, the page turns into a 404 error. You lose money each time this happens.
08. Test Forms and CRM Interaction
You definitely don’t want to lose your new leads from your new site. Manual submit each form to make sure you:
- Get an email notification at the appropriate email.
- The form gets capture in a database.
If you have an email capture form connected to a CRM or email provider like MailChimp, enter a test email to make sure those platforms are capturing submitted emails.
We can’t tell you how many times during a site audit we’ll get a site where the developer forgot to connect the Facebook icon to the client’s Facebook page or some such.
Click each icon to make sure it is connected properly to your actual social media page.
10. Check for Your Favicon Icon
Make sure a Favicon is in place. The ‘favicon’ appears to the left of the page title in the web browser, and on browser tabs. Your users will notice if your website doesn’t have one.
They give your website credibility and help users navigate to your site when it’s open amongst their other tabs and bookmarks.
![]()
For instructions on installing a Favicon, check out this article.
11. Install an SEO Plugin
Make sure to install a plugin like YOAST or our proprietary plugin (that blows YOAST out of the water.) Go through the full set-up process.
12. Add Schema to Page Headers
Add schema markup code to every page on the site. Customize the code where possible on each page. While this is an advanced practice, it has enormous SEO implications.
13. Check Your RSS Feed
Make sure your RSS feed is populating all your newest blog feeds. Typically you will find this feed at yoursitename.com/feed
You should see a page with code on it appear. If you have posted a blog, look through the code for the blog title name. This ensures it is picking up your new content.
14. Look for Your Privacy Policy and Terms of Service
Make sure your privacy policy and terms of service pages are up to date and included on the new site. We’ve seen this be forgotten before. This can cause compliance issues.
15. Get Some Google Love
Make sure you place the Google Analytics code in the header and that Google Analytics is tracking the site.
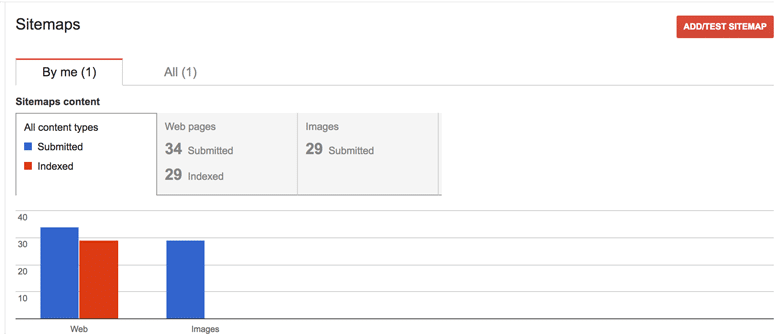
Also, submit your site to Google Search Console and submit the new dynamic XML sitemap as part of the process.
After the sitemap passes, select Crawl > Fetch as Google, then enter your domain and click “Fetch and Render.” This should speed up your indexing process.
Check the site’s pages to make sure they are NOT set to noindex, nofollow. Note: If you are using a clean-silo approach, DO noindex, nofollow your blog archive pages so as to not bleed the silos.
Check robots.txt file to make sure it is NOT set to noindex, nofollow.
Google will tell you on both platforms that you are authenticated.
Also, consider running your site through an SEO tester like Yeah! Local or SiteChecker.
16. Get Some Bing Love
Go to Bing Webmaster Tools. There is a very similar process to the Google one you completed above.
Bing is influential in voice search, so you want to be in top shape here, as well.
17. Get Some Facebook Love
If you are going to run any traffic from your Facebook account to the new page, make sure to install the Facebook pixel code in your header and test fire it.
18. Make Sure Your SSL Is Valid
If you have an SSL certificate on your site, and why wouldn’t you in 2018, make sure it is in place and functioning properly.
Revert any http:// page over to https://. This means if you type in http://yoursitename.com/yourpagename it should revert to https://yoursitename.com/yourpagename.
19. Site Backups and Security
Do a local master backup of the entire site immediately after launch. Also, check to see how your hosting provider performs backups. Many hosts, like Flywheel, will perform nightly backups. This is ideal.
See how your hosting handles security. You may need to install a plug-in like Wordfence. Go through the full set-up procedure. We suggest blocking countries that you do not serve.
20. If E-Commerce is Involved
Test several orders to ensure:
- Orders are being received.
- Proper shipping is being calculated.
- Payment is being accepted and received.
We encourage clients to do lots of testing here. You can always cancel the test orders. Order one something, multiples of that something, and a combination of products in your testing.
21. Catalyze Your Launch
During the first week of your launch, add at LEAST one blog to the site to trigger a fresh content notice by search bots.
We also highly recommend a syndicated press release using Press Synergy or other services to get backlinks to the new site to increase the speed of full indexing by search engines.
Let Us Help
Of course, if Moon & Owl designs your site, this will all be completed with meticulous care for you.
If someone else built your site, we can perform a launch optimization service for you immediately post-launch.
We’ll even complete more optimizations including leveraging your category pages and more on-page SEO.
Many freelancer designers don’t have the web design or SEO know-how to complete all of these items.
We’ll ensure you site launch is a resounding success.